A day with .Net

My day to day experince in .net

Archive for the ‘Docker’ Category

Docker file for ASPNET CORE 5

Posted by vivekcek on November 26, 2020

In this post i am sharing the docker file to build a docker image for aspnet core 5.

FROM mcr.microsoft.com/dotnet/sdk:5.0 AS build
WORKDIR /app

# copy csproj and restore as distinct layers
COPY *.csproj ./
RUN dotnet restore

# copy everything else and build app
COPY . ./
RUN dotnet publish -c Release -o out

FROM mcr.microsoft.com/dotnet/aspnet:5.0 AS runtime
WORKDIR /app
COPY --from=build /app/out .
ENTRYPOINT ["dotnet", "My.API.dll"]

Posted in Docker | Tagged: , | Leave a Comment »

Dockerizing spring boot application with light weight OpenJDK 11 – Escape from Oracle licensing cost

Posted by vivekcek on October 5, 2019

I was planning to deploy one of my SpringBoot application into production. The app was developed with Oracle JDK. But i want to save money by running the app in OpenJDK. To do that you can use below docker file.

FROM adoptopenjdk/openjdk11:latest

EXPOSE 8181

COPY ./target/ProductService-0.0.1.jar /usr/app/

WORKDIR /usr/app

RUN sh -c 'touch ProductService-0.0.1.jar'

ENTRYPOINT ["java","-jar","ProductService-0.0.1.jar"]

Posted in Docker, Java | Tagged: , | Leave a Comment »

Serverless meet Containerization – Running Azure functions in Docker and then to Kubernetes.

Posted by vivekcek on June 23, 2018

Microservices, Containerization and Serverless are the current hot architecture patterns in our industry.Each have their pros and cons. I will disuss about the selection criteria for these in a later post.

In this post i am trying to bring the Microsoft serverless platform Azure functions inside the Docker Container.

1. Make sure you installed Docker for windows Edge.
2. Switch to Linux containers. Azure functions now support only linux images.
3. Install Azure Functions CLI Version 2.0 from this link https://docs.microsoft.com/en-us/azure/azure-functions/functions-run-local
4. After installing the CLI open command prompt and issue below command.

func init MyFunctionProject --docker

5. Select dotnet

6. Now switch to MyFunctionProject folder and issue below command. Select HTTP Triger as template.

func new

7.Now issue below command to test whether your function work fine locally.

func host start

8. Your function will run at http://localhost:7071/api/myfunction?name=”vivek”
9. Now add a Docker file.

FROM microsoft/azure-functions-base:dev-nightly
ENV AzureWebJobsScriptRoot=/home/site/wwwroot
COPY . /home/site/wwwroot

10. Now build the Docker Image.

docker build -t functionapp .

11. Now run the image.

docker run -p 8080:80 functionapp

12. Your function will be running at http://localhost:8080/api/myfunction?name=”vivek”

4. Once the image is running successfully we can deploy the image to kubernetes.
5. First create a deployment.

kubectl run hello --image=functionapp:latest --image-pull-policy=IfNotPresent

6. Now create a service to expose the deployment aka pod.

kubectl expose deployment hello --type="LoadBalancer" --port=8080 --target-port=80

7.Now browse to http://localhost:8080/api/myfunction?name=”vivek”

Posted in Azure, Docker, Kubernetes | Leave a Comment »

Deploying a local ASP.NET Core docker image to kubernetes from your local machine (No docker registry)

Posted by vivekcek on June 23, 2018

I faced some issues in deploying a local asp.net core image to my local kubernetes cluster.So in this post I will describe the steps to deploy a local docker image to kubernetes cluster.Hope you installed Docker For Windows Edge version and Enabled Kubernetes support, Also switch to Linux containers.

1. First build a local asp.net core docker image from below docker file. Use linux container.

FROM microsoft/aspnetcore-build:2.0 AS build-env
WORKDIR /app
EXPOSE 80

WORKDIR /app

# Copy csproj and restore as distinct layers
COPY *.csproj ./
RUN dotnet restore 

# Copy everything else and build
COPY . ./
RUN dotnet publish -c Release -o out

# Build runtime image
FROM microsoft/aspnetcore:2.0
WORKDIR /app
COPY --from=build-env /app/out .

ENTRYPOINT ["dotnet", "KubeTest.dll"]

2. Now build your image.

docker build -t mycoreapp .

3. Now run your image. This step is optional, just verify your image is working fine.

docker run -p 8080:80 mycoreapp

4. Once the image is running successfully we can deploy the image to kubernetes.
5. First create a deployment.

kubectl run hello --image=mycoreapp:latest --image-pull-policy=IfNotPresent

6. Now create a service to expose the deployment aka pod.

kubectl expose deployment hello --type="LoadBalancer" --port=8080 --target-port=80

7.Now browse to http://localhost:8080/

Posted in Docker, Kubernetes | Tagged: | Leave a Comment »

Installing and Uninstalling of Kubernetes Dashboard – Docker for windows

Posted by vivekcek on June 17, 2018

I installed the Docker for windows edge with Kubernetes enabled(Switch to linux containers to use kubernetes with docker for windows edge).
After deploying a pod to kubernetes, I found that the kubernetes dashboard is missing. So i tried to install it from various sources.
End of the day my dashboard installation got corrupted and I had to re-install it again.

In this post, I will show you how to install kubernetes dashboard first, then how to uninstall and reinstall.

1. Download and install Docker for windows edge.
2. Enable kubernetes.
3. Docker for windows is not coming with kubernetes dashboard. So we need to install it manually.
4. Run Docker as administrator.
5. Open command prompt and enter below command.

kubectl create -f https://raw.githubusercontent.com/kubernetes/dashboard/master/src/deploy/recommended/kubernetes-dashboard.yaml

6. After installation run below command.

kubectl proxy

7. Now open the browser and paste below url.

http://localhost:8001/api/v1/namespaces/kube-system/services/https:kubernetes-dashboard:/proxy/.

How to uninstall dashboard.

Execute below commands, one by one. Then follow the above installation steps 5 to 7.

kubectl delete deployment kubernetes-dashboard --namespace=kube-system 
kubectl delete service kubernetes-dashboard  --namespace=kube-system 
kubectl delete role kubernetes-dashboard-minimal --namespace=kube-system 
kubectl delete rolebinding kubernetes-dashboard-minimal --namespace=kube-system
kubectl delete sa kubernetes-dashboard --namespace=kube-system 
kubectl delete secret kubernetes-dashboard-certs --namespace=kube-system
kubectl delete secret kubernetes-dashboard-key-holder --namespace=kube-system

Posted in Docker, Kubernetes, kubernetes dashboard instllation | Tagged: , , , | Leave a Comment »

Connecting to local or remote SQL Server from Docker Container

Posted by vivekcek on June 10, 2018

In this post, I will show you how to connect from a docker container to local sql express running in your machine.
Please note that the SQL Server is not running inside a docker container. SQL is installed in my machine.

My docker container host an asp.net core application with EF Core. During the local debugging the app was perfectly connecting to my sql database. But after deploying the app to docker container I got exception like unable to connect to sql server.

So why this happen?. Here the docker container is running as a separate machine inside your host computer. So to connect to the sql database in your host machine, you need to enable remote connections to sql server.

So follow below steps to enable remote connections to sql server.

1. You must configure SQL Server with Mixed Mode Authentication. For remote connection you need to supply user name and password.
2. Open SQL Server Configuration Manager as Administrator.

3.Now select Protocols for SQL and then select TCP/IP now open the Properties by right click.
4.In the TCP/IP properties window enable TCP/IP for SQL Server (Enabled=Yes, Listen All=Yes).

5.Now select IP Addresses tab in properties window. And under IPAll give port number as 49172.

6. Now restrat SQL Server service.

7.Make sure SQL Server Browser is running, if not start it.

7. Now setup your firewall to accept inbound connection to 49172.

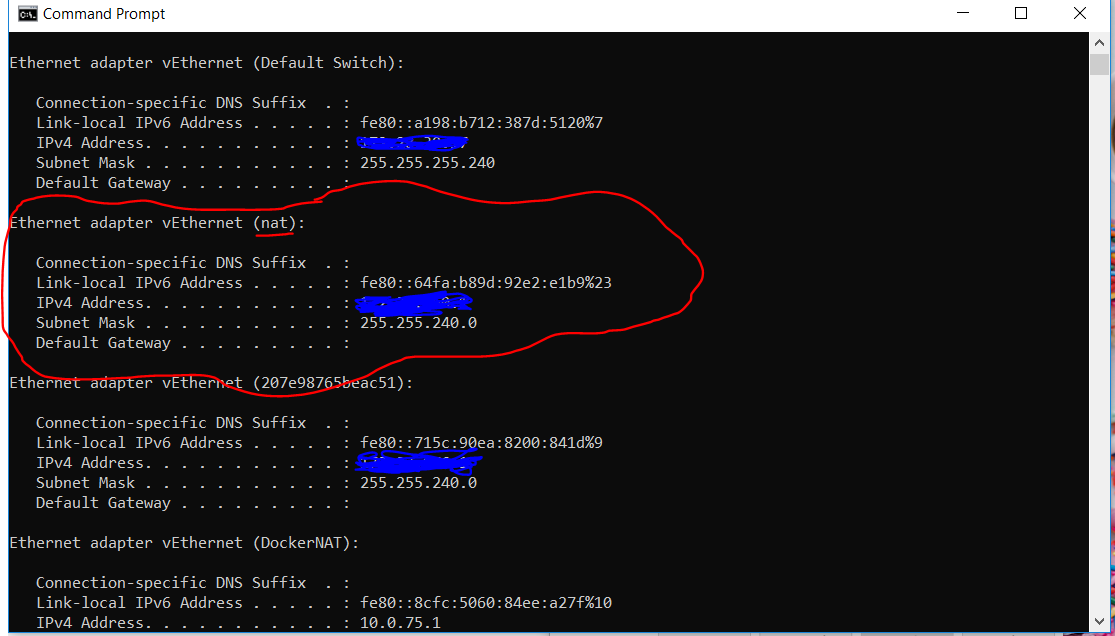
8.To connect to sql server from docker, you can’t use the host computer name. You need to find the right ip address of you host.

9. Open command prompt and issue “ipconfig” command, Then you can see a nat ip address of Docker NAT ip address copy it.

10. Now we need to make sure, we can connect to this ip from our docker container.
11.User “docker ps” command to find the id of your running container.
12. Now use the “docker exec -i cmd” to get command prompt from your container. And use the ping command to chek the ip address connectivity.

13. If the connectivity is fine you can use below connection string.

Data Source=<IPAddress>\\SQLEXPRESS,49172;Database=<Database name>;User ID=sa;Password=<Your password>;MultipleActiveResultSets=true;

Posted in Docker | Tagged: , , , | 2 Comments »

Pushing your local docker image to Azure Container Registry

Posted by vivekcek on March 18, 2018

In the last post, i wrote about how can we create and run Docker image locally.

Docker Hello World with ASP.NET Core

Today, i will show you how can we push this local Docker image to Azure Container Registry.Azure Container Registry is a private Docker Registry like Docker Hub, to which we can store our docker images.The Docker images stored in this registry can be deployed to a kubernetes cluster easily.

So what are the tools we required.

1. Docker CE.
2. Azure CLI.
3. Azure Subscription.

I am planning to use the Docker image created in the last post. So refer that post to create a docker image.
Before starting make sure Docker is running in your PC with admin privilege.

1. First go to Azure Portal.

2. Search for Azure Container Registry.

3. Create a container registry.Note down the name of the registry (Ex:vivekcek).

4. Once the registry is created, from the Acess Key tab note down the login server name (ex:vivekcek.azurecr.io).

5. Now open the command prompt as Administartor(Azure CLI must be installed).

6. Issue below command to login(Docker must be running for login).

az acr login --name vivekcek

7.Now list the available images in your docker.

docker ps

8. Now tag myapp image.

docker tag myapp vivekcek.azurecr.io/myapp:v1

9. Now push the taged myapp image.

docker push vivekcek.azurecr.io/myapp

10. Now in azure portal under Repository tab see your image.

Posted in Azure, Docker | Tagged: | Leave a Comment »

Docker Hello World with ASP.NET Core

Posted by vivekcek on March 3, 2018

I follow this rule “Never apply a technology in a project for the purpose of learning/using it”.
The above rule is applicable for Docker also, Use it if you are planning something big and have budget to rewrite after 3 years.
Sometimes you can keep things simple,thus by save money and time.

Anyway come back to my Docker journey.

1. I had to install a 64 bit version of Windows 10 and Visual Studio 2017.
2. Downloaded and installed Docker CE.
3. During the first start Docker enabled Hyper-V, that’s great.
4. Then i got an error message “You don’t have enough memory to start Docker”.
5. Go to Docker Settings from task-bar quick launch icon. Then reduced memory size to 1500mb.

6. You have to start Docker as Administrator.
7. Once your Docker is running, Open a Command Prompt as Administrator.
8. First i switched to my drive D and created a folder “myapp”.
9. Now issue below command to create an empty Asp.net core app.

dotnet new  web

10.Now issue dotnet run to run your app.

dotnet run

11.Check whetaher your app is running at http://localhost:5000
12. Now publish you app.

dotnet publish -c Release

13.Now inside this folder “bin\Release\netcoreapp2.0\publish”, Create a file named Dockerfile.
14.You can use notepad for that.
15. Place the below text inside your Dockerfile.

FROM microsoft/aspnetcore
WORKDIR /app
COPY . .
EXPOSE 80
ENTRYPOINT ["dotnet", "myapp.dll"]

16.Now build your Docker image using the build command.

docker build . -t myapp -f ./Dockerfile.txt

17.Once building finished check your docker images by this command.

docker images

18. Now run your Docker app.

docker run -p 8000:80 myapp

19. Your app will be running at port 8000

Posted in Docker | Tagged: , , | Leave a Comment »