A day with .Net

My day to day experince in .net

Archive for January, 2018

Micro Services Architecture – Design Authentication with Identity Server SQL Server and ASP.NET Core Part-3.

Posted by vivekcek on January 27, 2018

This is the continuation from my previous two post. Have a look at those below.

Micro Services Architecture – Design Authentication with Identity Server SQL Server and ASP.NET Core Part-1

Micro Services Architecture – Design Authentication with Identity Server SQL Server and ASP.NET Core Part-2

Today we will move our users from IdentityServer’s in-memory to SQL Server.

So first of all we need to install below nuget packages. Please note this is applicable for ASP.NET Core 1.1 version only.

1.Install IdentityServer4.EntityFramework nuget 1.x version. Use the latest one.

2.Add Microsoft.EntityFrameworkCore.SqlServer. Use the latest 1.x version.

3.Add Microsoft.EntityFrameworkCore.Design. Use the latest 1.x version.

4.Now edit the project and add below tag.

 <ItemGroup>
    <DotNetCliToolReference Include="Microsoft.EntityFrameworkCore.Tools.DotNet" Version="1.1.5" />
  </ItemGroup>

5.Now got to your solution directory and check whether Entity Framework is correctly installed. Use the “dotnet ef” command.

6.Create a database named “IdentityServices” in SQL Server.

7.Update your Config.cs as below.

using IdentityServer4.Models;
using IdentityServer4.Test;
using System;
using System.Collections.Generic;
using System.Linq;
using System.Threading.Tasks;

namespace IdentityServices
{
    public class Config
    {

        public static IEnumerable<ApiResource> GetApiResources()
        {
            return new List<ApiResource>
            {
                new ApiResource("api1", "My API")
            };
        }

        public static IEnumerable<Client> GetClients()
        {
            return new List<Client>
            {
              
                new Client
                {
                    ClientId = "client",
                    AllowedGrantTypes = GrantTypes.ResourceOwnerPassword,

                    ClientSecrets =
                    {
                        new Secret("secret".Sha256())
                    },
                    AllowedScopes = { "api1" }
                }
            };
        }
    

    }
  
}

8.Add a class named User.

using System;
using System.Collections.Generic;
using System.ComponentModel.DataAnnotations;
using System.Linq;
using System.Threading.Tasks;

namespace IdentityServices
{
    public class User
    {
        [Key]
        public string Id { get; set; }
        public string Email { get; set; }
        public bool Active { get; set; }
        public string Password { get; set; }
    }
}

9.Now add a DbContext class name “ApplicationDbContext”.

using Microsoft.EntityFrameworkCore;
using System;
using System.Collections.Generic;
using System.Linq;
using System.Threading.Tasks;

namespace IdentityServices
{
    public class ApplicationDbContext : DbContext
    {
        public ApplicationDbContext(DbContextOptions<ApplicationDbContext> options) : base(options) { }

        public DbSet<User> Users { get; set; }
    }
}

10.Now add a class named DataAcess.

using System;
using System.Collections.Generic;
using System.Linq;
using System.Threading.Tasks;
using IdentityServer4.Models;
using IdentityServer4.Validation;
using System.Security.Claims;

using IdentityModel;
using IdentityServer4.Extensions;

using IdentityServer4.Services;

namespace IdentityServices
{
    public interface IAuthRepository
    {
        User GetUserById(string id);
        User GetUserByUsername(string username);
        bool ValidatePassword(string username, string plainTextPassword);
    }

    public class AuthRepository : IAuthRepository
    {
        private ApplicationDbContext db;

        public AuthRepository(ApplicationDbContext context)
        {
            db = context;
        }

        public User GetUserById(string id)
        {
            var user = db.Users.Where(u => u.Id == id).FirstOrDefault();
            return user;
        }

        public User GetUserByUsername(string username)
        {
            var user = db.Users.Where(u => String.Equals(u.Email, username)).FirstOrDefault();
            return user;
        }


        public bool ValidatePassword(string username, string plainTextPassword)
        {
            var user = db.Users.Where(u => String.Equals(u.Email, username)).FirstOrDefault();
            if (user == null) return false;
            if (String.Equals(plainTextPassword, user.Password)) return true;
            return false;
        }
    }

    public class ResourceOwnerPasswordValidator : IResourceOwnerPasswordValidator
    {
        IAuthRepository _rep;

        public ResourceOwnerPasswordValidator(IAuthRepository rep)
        {
            this._rep = rep;
        }

        public Task ValidateAsync(ResourceOwnerPasswordValidationContext context)
        {
            if (_rep.ValidatePassword(context.UserName, context.Password))
            {
                context.Result = new GrantValidationResult(_rep.GetUserByUsername(context.UserName).Id, "password", null, "local", null);
                return Task.FromResult(context.Result);
            }
            context.Result = new GrantValidationResult(TokenRequestErrors.InvalidGrant, "The username and password do not match", null);
            return Task.FromResult(context.Result);
        }
    }

    public class ProfileService : IProfileService
    {
        private IAuthRepository _repository;

        public ProfileService(IAuthRepository rep)
        {
            this._repository = rep;
        }

        public Task GetProfileDataAsync(ProfileDataRequestContext context)
        {
            try
            {
                var subjectId = context.Subject.GetSubjectId();
                var user = _repository.GetUserById(subjectId);

                var claims = new List<Claim>
            {
                new Claim(JwtClaimTypes.Subject, user.Id.ToString()),
				//add as many claims as you want!new Claim(JwtClaimTypes.Email, user.Email),new Claim(JwtClaimTypes.EmailVerified, "true", ClaimValueTypes.Boolean)
			};

                context.IssuedClaims = claims;
                return Task.FromResult(0);
            }
            catch (Exception x)
            {
                return Task.FromResult(0);
            }
        }

        public Task IsActiveAsync(IsActiveContext context)
        {
            var user = _repository.GetUserById(context.Subject.GetSubjectId());
            context.IsActive = (user != null) && user.Active;
            return Task.FromResult(0);
        }
    }
}

11.Now update your Startup.cs.

using System;
using System.Collections.Generic;
using System.Linq;
using System.Threading.Tasks;
using Microsoft.AspNetCore.Builder;
using Microsoft.AspNetCore.Hosting;
using Microsoft.AspNetCore.Http;
using Microsoft.Extensions.DependencyInjection;
using Microsoft.Extensions.Logging;
using System.Reflection;
using Microsoft.EntityFrameworkCore;
using IdentityServer4.EntityFramework.Mappers;
using IdentityServer4.EntityFramework.DbContexts;
using IdentityServer4.Validation;
using IdentityServer4.Services;

namespace IdentityServices
{
    public class Startup
    {
        // This method gets called by the runtime. Use this method to add services to the container.
        // For more information on how to configure your application, visit https://go.microsoft.com/fwlink/?LinkID=398940
        const string connectionString = @"Data Source=.;database=IdentityServices;uid=sa;pwd=password;";
        string migrationsAssembly = typeof(Startup).GetTypeInfo().Assembly.GetName().Name;
        public void ConfigureServices(IServiceCollection services)
        {

            services.AddTransient<IResourceOwnerPasswordValidator, ResourceOwnerPasswordValidator>()
            .AddTransient<IProfileService, ProfileService>()
            .AddTransient<IAuthRepository, AuthRepository>();

            services.AddDbContext<ApplicationDbContext>(options =>
                            options.UseSqlServer(connectionString)
                    );

            services.AddIdentityServer()
            .AddDeveloperSigningCredential()
            .AddInMemoryApiResources(Config.GetApiResources())
            .AddInMemoryClients(Config.GetClients())
            .AddConfigurationStore(builder =>
             builder.UseSqlServer(connectionString, options =>
            options.MigrationsAssembly(migrationsAssembly)))
            .AddOperationalStore(builder =>
            builder.UseSqlServer(connectionString, options =>
            options.MigrationsAssembly(migrationsAssembly)));
        }

        // This method gets called by the runtime. Use this method to configure the HTTP request pipeline.
        public void Configure(IApplicationBuilder app, IHostingEnvironment env, ILoggerFactory loggerFactory)
        {
            InitializeDatabase(app);

            loggerFactory.AddConsole();

            if (env.IsDevelopment())
            {
                app.UseDeveloperExceptionPage();
            }


            app.UseIdentityServer();
        }

        private void InitializeDatabase(IApplicationBuilder app)
        {
            using (var serviceScope = app.ApplicationServices.GetService<IServiceScopeFactory>().CreateScope())
            {
                serviceScope.ServiceProvider.GetRequiredService<PersistedGrantDbContext>().Database.Migrate();
                serviceScope.ServiceProvider.GetRequiredService<ApplicationDbContext>().Database.Migrate();
                var context = serviceScope.ServiceProvider.GetRequiredService<ConfigurationDbContext>();
                context.Database.Migrate();
                if (!context.Clients.Any())
                {
                    foreach (var client in Config.GetClients())
                    {
                        context.Clients.Add(client.ToEntity());
                    }
                    context.SaveChanges();
                }

                //if (!context.IdentityResources.Any())
                //{
                //    foreach (var resource in Config.GetIdentityResources())
                //    {
                //        context.IdentityResources.Add(resource.ToEntity());
                //    }
                //    context.SaveChanges();
                //}

                if (!context.ApiResources.Any())
                {
                    foreach (var resource in Config.GetApiResources())
                    {
                        context.ApiResources.Add(resource.ToEntity());
                    }
                    context.SaveChanges();
                }
            }
        }
    }
}

12.Now run these migrations, one by one.

dotnet ef migrations add InitialIdentityServerPersistedGrantDbMigration -c PersistedGrantDbContext -o Data/Migrations/IdentityServer/PersistedGrantDb
dotnet ef migrations add InitialIdentityServerConfigurationDbMigration -c ConfigurationDbContext -o Data/Migrations/IdentityServer/ConfigurationDb
dotnet ef migrations add InitialIdentityServerApplicationDbMigration -c ApplicationDbContext -o Data/Migrations/IdentityServer/ApplicationDb

13.Now run the IdentityService application and check your database.

14.Add a user to your table User.

15.Now check with Postman.

Posted in Microservices | Tagged: , , , , , | Leave a Comment »

Build and deploy ASP.NET application to Azure via GitHub and Bamboo Server (CI\CD)

Posted by vivekcek on January 26, 2018

Bamboo Server is the choice of professional teams for continuous integration, deployment, and delivery.

In this post I will explain, How to configure Bamboo to build and deploy to Azure from GitHub repository.

1.This is how my git repo looks like.

2.When you clone this looks like as below. You can see my solution is actually inside a folder named “AzureSite”. When we configure our paths we need to consider this.

3.Now open your Bamboo Server, and create build plan. Fill the Project and build plan name section and “Link repository to new build plan.

4.Now in the Configure task section. First set your Source Code Checkout Task. Select the repository we connected in the previous step.

5.Now create a Script task to restore our nuget packages. Use the below script.

"C:\Program Files (x86)\NuGet\nuget.exe" restore "${bamboo.build.working.directory}\AzureSite\AzureSite.sln"

6.Now Add an MsBuild task as below.

7.Now create and Run the plan.

8.Now create an Artifacts for deployment. Please check the share checkbox.

9.Now create a deployment project.

10.Now create an environment.
11.Now Configure Artifact download task. Select the artifacts we create in step 8.

12.Now from azure download your publisher profile and import to your project.
13.Now add an MsBuild task for deploy. Use the below options

/p:Configuration=Debug /p:DeployOnBuild=True /p:PublishProfile="DeployToAzure" /p:ProfileTransformWebConfigEnabled=False /p:Password=PassworddFromDownloaded /p:AllowUntrustedCertificate=true

Posted in CI/CD Bamboo | Tagged: , , , , | Leave a Comment »

Micro Services Architecture – Design Authentication with IdentityServer4, SQL Server and ASP.NET Core Part-2

Posted by vivekcek on January 20, 2018

This is the continuation of my first post about “Setting up IdentityServer4 for token based authentication in Microservices architecture”

Please read the first part.
Micro Services Architecture – Design Authentication with IdentityServer4, SQL Server and ASP.NET Core Part-1

In this part we will create a Web Api. To access this Web Api first we need to get a valid token from our Identity Server. After getting the token we can call the Web Api.

Please note that we are using ASP.NET Core 1.1. The steps to do the same in ASP.NET Core 2.0 is little bit different.

1.Create a Web Api project named Protected Api.

2.Select Web Api template.

3.Now add nuget package named “IdentityServer4.AccessTokenValidation”.

4.Now update your Configure method in Startup.cs

 public void Configure(IApplicationBuilder app, IHostingEnvironment env, ILoggerFactory loggerFactory)
        {
            app.UseIdentityServerAuthentication(new IdentityServerAuthenticationOptions
            {
                Authority = "http://localhost:5000",
                RequireHttpsMetadata = false,

                ApiName = "api1"
            });

            app.UseMvc();
        }

5.Now create a controller as below with Authorize attribute.

 [Route("api/[controller]")]
    public class ValuesController : Controller
    {
        [Authorize]
        [HttpGet]
        public IActionResult Get()
        {
            return new JsonResult(User.Identity.IsAuthenticated);
        }

    }

6.Now first start our IdentityService. Then get a token as explained in the Part 1.
7.Now use that token with Postman to call our protected Api.

Posted in Microservices | Tagged: , , , | Leave a Comment »

Micro Services Architecture – Design Authentication with IdentityServer4, SQL Server and ASP.NET Core Part-1

Posted by vivekcek on January 20, 2018

Micro Services architecture is one of the hot topic in developer community.

I recommend micro services architecture if you face the below scenarios.

1. Use it when you are going to build next Amazon, Facebook, Uber etc.
2. You need to build a large system with a set of people with different technology stack.
3. You are building for high availability and fault tolerance.
4. You want to reduce the time to market.

To succeed with this architecture. You need below thing

1. A team of good architects who understand the architecture and business domain very well.
2. Everyday refine the architecture, if you find any flaws.
3. Should be able to define the boundaries of each micro services.
4. First day onward design the architecture for availability, Security, resilience.
5. Agile is good but execute it with creative people, who know how to execute it better.

In micro services architecture the first thing we can do is design our authentication system.

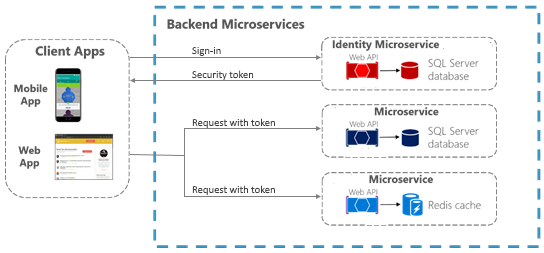
Here I am going to setup a Token Based authentication system with Identity Server 4. This is how it looks.

These are my Tools.

1.Visual Studio 2017(15.0)
2.ASP.NET Core 1.1
3.SQL Server 2014
4.Post Man

Please note that the steps will be different for ASP.NET Core 2.0.

1.Create an ASP.NET Core 1.1 project.

2.Select empty template.

3.Now add the IdentityServer 4 nuget package (We are using 1.5.2 version , 1.x versions are for ASP.NET Core 1.1).

4.We want our users to be signed with Username and Password.
5.Now add a class named Config.cs in your solution and paste below code.

using IdentityServer4.Models;
using IdentityServer4.Test;
using System;
using System.Collections.Generic;
using System.Linq;
using System.Threading.Tasks;

namespace IdentityServices
{
    public class Config
    {

        public static IEnumerable<ApiResource> GetApiResources()
        {
            return new List<ApiResource>
            {
                new ApiResource("api1", "My API")
            };
        }

        public static IEnumerable<Client> GetClients()
        {
            return new List<Client>
            {
              
                new Client
                {
                    ClientId = "client",
                    AllowedGrantTypes = GrantTypes.ResourceOwnerPassword,

                    ClientSecrets =
                    {
                        new Secret("secret".Sha256())
                    },
                    AllowedScopes = { "api1" }
                }
            };
        }


        public static List<TestUser> GetUsers()
        {
            return new List<TestUser>
            {
                new TestUser
                {
                    SubjectId = "1",
                    Username = "vivek",
                    Password = "password"
                }
               
            };
        }

    }

   
}

6.Now update your Startup.cs as below.

using System;
using System.Collections.Generic;
using System.Linq;
using System.Threading.Tasks;
using Microsoft.AspNetCore.Builder;
using Microsoft.AspNetCore.Hosting;
using Microsoft.AspNetCore.Http;
using Microsoft.Extensions.DependencyInjection;
using Microsoft.Extensions.Logging;

namespace IdentityServices
{
    public class Startup
    {
        
        public void ConfigureServices(IServiceCollection services)
        {
            services.AddIdentityServer()
                .AddTemporarySigningCredential()
                .AddInMemoryApiResources(Config.GetApiResources())
                .AddInMemoryClients(Config.GetClients())
                .AddTestUsers(Config.GetUsers());
        }

       
        public void Configure(IApplicationBuilder app, IHostingEnvironment env, ILoggerFactory loggerFactory)
        {

            loggerFactory.AddConsole();

            if (env.IsDevelopment())
            {
                app.UseDeveloperExceptionPage();
            }

            app.UseIdentityServer();

        }
    }
}

7.Now open your project properties and in Debug tab change profile from IISExpress to your project, then update you app url to http://localhost:5000/

8.Now run the app. Select IdentityServices.

9.The app will run as a console application.

10.Now open post man and try this.

In the next post we will move the users to SQL Server.

Posted in Microservices | Tagged: , , | Leave a Comment »

Resilient HTTP call with retry and exponential back-off – Micro-services architecture.

Posted by vivekcek on January 11, 2018

During the designing of a microservice architecture based application, i came across a scenario in which i need to make sure the http call to other services need to retry for ensuring resilence.

The approach i tried is retry the http call when request exception occur. And each retry is performed after a particular time interwell, which is exponenetial in nature.

To implement this i used a nuget package named polly.

This is the Resilient HTTP class we wrote, You can use an interface and dependency injection for productions app.

public interface IHttpClient
{
Task<string> GetStringAsync(string uri, string authorizationToken = null,
string authorizationMethod = "Bearer");
Task<HttpResponseMessage> PostAsync<T>(string uri, T item,
string authorizationToken = null, string requestId = null,
string authorizationMethod = "Bearer");
Task<HttpResponseMessage> DeleteAsync(string uri,
string authorizationToken = null, string requestId = null,
string authorizationMethod = "Bearer");
}
public class ResilientHttpClient : IHttpClient
{
private HttpClient _client;
private PolicyWrap _policyWrapper;
private ILogger<ResilientHttpClient> _logger;
public ResilientHttpClient(Policy[] policies,
ILogger<ResilientHttpClient> logger)
{
_client = new HttpClient();
_logger = logger;
// Add Policies to be applied
_policyWrapper = Policy.WrapAsync(policies);
}
private Task<T> HttpInvoker<T>(Func<Task<T>> action)
{
// Executes the action applying all
// the policies defined in the wrapper
return _policyWrapper.ExecuteAsync(() => action());
}
public Task<string> GetStringAsync(string uri,
string authorizationToken = null,
string authorizationMethod = "Bearer")
{
return HttpInvoker(async () =>
{
var requestMessage = new HttpRequestMessage(HttpMethod.Get, uri);
var response = await _client.SendAsync(requestMessage);
return await response.Content.ReadAsStringAsync();
});
}
}

Now in your WebApi’s Startup.cs write below code.

// Startup.cs class
if (Configuration.GetValue<string>("UseResilientHttp") == bool.TrueString)
{
services.AddTransient<IResilientHttpClientFactory,
ResilientHttpClientFactory>();
services.AddSingleton<IHttpClient,
ResilientHttpClient>(sp =>
sp.GetService<IResilientHttpClientFactory>().
CreateResilientHttpClient());
}
else
{
services.AddSingleton<IHttpClient, StandardHttpClient>();
}

public ResilientHttpClient CreateResilientHttpClient()
=> new ResilientHttpClient(CreatePolicies(), _logger);
// Other code
private Policy[] CreatePolicies()
=> new Policy[]
{
Policy.Handle<HttpRequestException>()
.WaitAndRetryAsync(
// number of retries
6,
// exponential backoff
retryAttempt => TimeSpan.FromSeconds(Math.Pow(2, retryAttempt)),
// on retry
(exception, timeSpan, retryCount, context) =>
{
var msg = $"Retry {retryCount} implemented with Pollys
RetryPolicy " +
$"of {context.PolicyKey} " +
$"at {context.ExecutionKey}, " +
$"due to: {exception}.";
_logger.LogWarning(msg);
_logger.LogDebug(msg);
}),
}

Posted in Microservices | Leave a Comment »

Location Permission in Android Version 6 (android 6.0 marshmallow) With API Level 23

Posted by vivekcek on January 2, 2018

I was developing an android taxi app with gps location. Initially i targeted the app for API level 26 and later i decided for API level 23. In the app i need to get location permission at run time. I placed required attributes in android manifest as below.

 <uses-permission android:name="android.permission.ACCESS_FINE_LOCATION" />
 <uses-permission android:name="android.permission.ACCESS_COARSE_LOCATION" />
 <uses-permission android:name="android.permission.INTERNET" />
 <uses-permission android:name="android.permission.READ_EXTERNAL_STORAGE" />

Then i asked for permission using the code below. Unfortunately after deploying the app in a marshmallow, the app never asked for permission. Then i went to App manager and gave permission manually.

  if (ActivityCompat.checkSelfPermission(this, android.Manifest.permission.ACCESS_FINE_LOCATION) != PackageManager.PERMISSION_GRANTED && ActivityCompat.checkSelfPermission(this, android.Manifest.permission.ACCESS_COARSE_LOCATION) != PackageManager.PERMISSION_GRANTED) {

            return;
        }

After some research i learn that to get run-time location permission in marshmallow, you have to try below steps in your Activity.

1. Override below method.

final int LOCATION_REQUEST_CODE = 1;
    @Override
    public void onRequestPermissionsResult(int requestCode, @NonNull String[] permissions, @NonNull int[] grantResults) {
        super.onRequestPermissionsResult(requestCode, permissions, grantResults);
        switch (requestCode) {
            case LOCATION_REQUEST_CODE: {
                if (grantResults.length > 0 && grantResults[0] == PackageManager.PERMISSION_GRANTED) {
                    mapFragment.getMapAsync(this);
                } else {
                    Toast.makeText(getApplicationContext(), "Please provide the permission", Toast.LENGTH_LONG).show();
                }
                break;
            }
        }
    }

2. Request permission using below code.

if (ActivityCompat.checkSelfPermission(this, android.Manifest.permission.ACCESS_FINE_LOCATION) != PackageManager.PERMISSION_GRANTED && ActivityCompat.checkSelfPermission(this, android.Manifest.permission.ACCESS_COARSE_LOCATION) != PackageManager.PERMISSION_GRANTED) {
            ActivityCompat.requestPermissions(DriverMapActivity.this, new String[]{android.Manifest.permission.ACCESS_FINE_LOCATION}, LOCATION_REQUEST_CODE);
        }else{
            mapFragment.getMapAsync(this);
        }

Posted in Android c# | Tagged: , , , , | Leave a Comment »